Gadget_guy
New member
- Joined
- Aug 4, 2020
- Messages
- 6
- Reaction score
- 3
- Points
- 3
OK, got my brake controller wired up today. I bought this one because it was the most "minimal" visual end product. It's more expensive than most others, but does not clutter up your dash or get in the way of the knee airbag. Hope to help others to save them the $379 install quote I got for having it done.


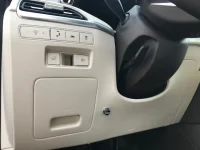
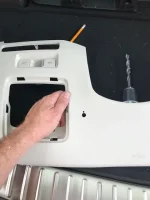
So the deal it you need to remove that panel to access and drill the panel. The top right is the hardest set of clips to release. Use care as to not bend too much. The lower left has to come up away from the hood release and that can't be done until the rest of the clips are popped off.
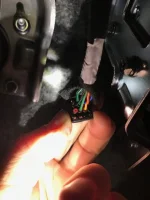
The diagnostic plug and the brake/trunk connector pop off easily.

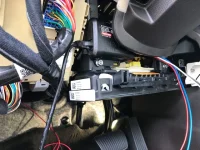
I tapped into the brake light at the connector on the top of the brake pedal. It's a green wire with black stripe in the back row of wires. Not the green with red next to the blanked plug.

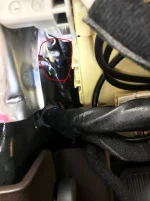
The ground I made at the ground connection of other wires using a 10mm socket and ring lug. That is to the left of the fuse box when the cover is off.0

The controller box I attached with bolt holding the knee airbag and some wire ties too.

If you don't know what you are looking for, it's the black box with the redarc (upside down) right of the wires of the interior fuse box. It uses a network wire to connect with the dial mounted in the dash or where you mount it.
Solder up the wires - power, brake light and wire to trailer hitch. Ground was just to lug mentioned above.
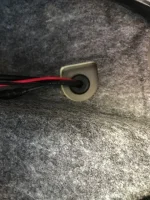
I ran wires out through hood release grommet. I ran an extra cable should I need one later for something.

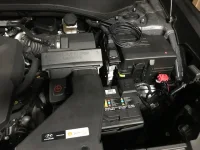
In the hood, I wired the power wire for brake controller to a new circuit breaker that I mounted near the fuse box. I ran wire to battery and then that wire goes to controller. (it's the red lego looking thing)

I have not run wire to 7 pin harness yet as I am going to a buddy's house next week to use his lift (he builds custom exhausts) so he will help me install Curt hitch which has been sitting around for weeks and run this wire without me laying on the driveway more. Also doing oil change now that I have tried to break in the car and get ready to tow my camper and boats and such.
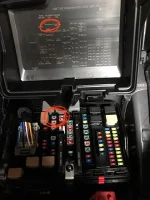
Also, I did discover that white wire going to trailer hitch adapter connector (I have the 4 pin harness then 4 to 7 pin adapter) is +12v power. It is connected to the 40A fuse in the hood labeled trailer. So, I wanted folks to know that. I did probe the wire and did take the fuse out to verify power went away and such. So for +12v power to charge your camper batteries - you can run a new wire and fuse (running brake wire anyway) but also know that 40A wire is there. The 4 pin adapter looks like it uses that 12v power to help power the trailer lights (that black box probably has relays that get signal, and then pull more power from +12v to power the non LED trailer lights since the existing wires and current available from vehicle is not enough. So know your limits and what you plan to do. You blow that fuse trying to run a wench or something, you will have no trailer lights.

So the deal it you need to remove that panel to access and drill the panel. The top right is the hardest set of clips to release. Use care as to not bend too much. The lower left has to come up away from the hood release and that can't be done until the rest of the clips are popped off.
The diagnostic plug and the brake/trunk connector pop off easily.
I tapped into the brake light at the connector on the top of the brake pedal. It's a green wire with black stripe in the back row of wires. Not the green with red next to the blanked plug.
The ground I made at the ground connection of other wires using a 10mm socket and ring lug. That is to the left of the fuse box when the cover is off.0
The controller box I attached with bolt holding the knee airbag and some wire ties too.
If you don't know what you are looking for, it's the black box with the redarc (upside down) right of the wires of the interior fuse box. It uses a network wire to connect with the dial mounted in the dash or where you mount it.
Solder up the wires - power, brake light and wire to trailer hitch. Ground was just to lug mentioned above.
I ran wires out through hood release grommet. I ran an extra cable should I need one later for something.
In the hood, I wired the power wire for brake controller to a new circuit breaker that I mounted near the fuse box. I ran wire to battery and then that wire goes to controller. (it's the red lego looking thing)
I have not run wire to 7 pin harness yet as I am going to a buddy's house next week to use his lift (he builds custom exhausts) so he will help me install Curt hitch which has been sitting around for weeks and run this wire without me laying on the driveway more. Also doing oil change now that I have tried to break in the car and get ready to tow my camper and boats and such.
Also, I did discover that white wire going to trailer hitch adapter connector (I have the 4 pin harness then 4 to 7 pin adapter) is +12v power. It is connected to the 40A fuse in the hood labeled trailer. So, I wanted folks to know that. I did probe the wire and did take the fuse out to verify power went away and such. So for +12v power to charge your camper batteries - you can run a new wire and fuse (running brake wire anyway) but also know that 40A wire is there. The 4 pin adapter looks like it uses that 12v power to help power the trailer lights (that black box probably has relays that get signal, and then pull more power from +12v to power the non LED trailer lights since the existing wires and current available from vehicle is not enough. So know your limits and what you plan to do. You blow that fuse trying to run a wench or something, you will have no trailer lights.